

 1A 3.5V 42x42x20mm 4 Wires (17HS08-1004S)")
 2A 42x48mm 4 Wires compatible with 3D Printer/CNC")

 2.8A 3.2V 57x57x76mm 4 Wires (23HS30-2804S)")
 3A 3.36V 57x57x76mm 4 Wires CNC Stepping Motor")
 4.2A 57x57x114mm 4 Wires CNC Stepper Motor (23HS45-4204S)")


 1.5A 42x42x38mm 4 Wires")
How to Change the current setting on the stepper motor driver
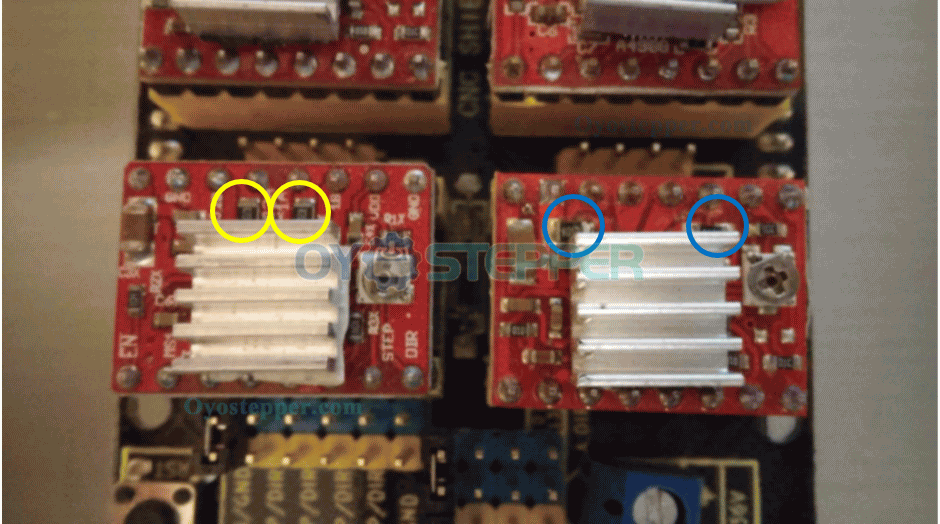
There are styles of stepper drivers that we have for the E3 and E4. Both styles work equally well, but the current needs to be set with different values. For the A4988 drivers, the yellow circles denote the driver with the R200 resistors. The blue circles are the R050 resistors. Note that these resistors are in different locations.
Changing the current setting on the stepper motor drivers for the E3 and E4 CNC routers
Avatar Bob Wood
1 year ago Updated
There are styles of stepper drivers that we have for the E3 and E4. Both styles work equally well, but the current needs to be set with different values. For the A4988 drivers, the yellow circles denote the driver with the R200 resistors. The blue circles are the R050 resistors. Note that these resistors are in different locations.
Setting the current on the A4899 stepper motor driver with a voltmeter.
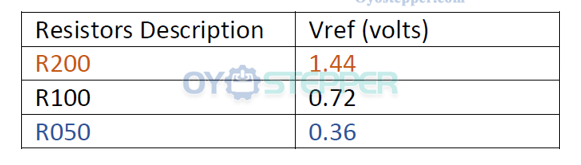
The current on the A4988 stepper drivers can be set easily with a volt-meter. The driver is set up to set a reference voltage (volts) that determines the current (amps) to drive the stepper motors. First, we will need to determine the correct current and resistor readings. The typical resistor values for the stepper driver are 0.2, 0.1, 0.05 ohms, 2 of which are shown below.
.png)
Once we know the resistor value we can calculate the resistance we need by using the formula
For the E3 and E4 CNC router, the current is set to be 0.85 to 0.95 amps.
We can set the voltage by holding the negative led to the ground and the positive led to the potentiometer as shown below. To turn the current up, turn clockwise. To turn the current down, turn counter clockwise.
.png)
Setting the current on the DRV8825 stepper motor driver with a voltmeter.
Current Limit = VREF × 2 which is 0.60 volts for the E3 and E4 CNC router.
No heatsink is required with the DRV8825 stepper motor drivers.
Setting the current on the A4988 or DRV8825 stepper motor driver without a voltmeter.
While a voltmeter will give you more accurate results. The drivers can be adjusted by turning them up or down 1/8 of a turn and checking for proper movement after each setting.
Stepper motor current too low – The stepper motor is cool to the touch after it has been on for a while. The stepper motor driver is not supplying enough current for the stepper motor to drive axis. Turn up the stepper motor current on the A4988 driver.
Stepper motor current too high –The stepper motor is hot to the touch after it is been on for a while. The stepper motor driver is heating up and going into protection mode. Once it cools it turns back on. This can look like erratic stepper motor movement. Turn down the stepper motor current on the A4988 driver.
Previous:Stepper Driver Guide for 3D Printer Mainboards
Next:What are Brushless DC Motors Used For?
